Set up permissions for 2 way texting within Visual-Eyes
If you notice that the Text Px button is greyed out for some Users this is due to their user permissions for Visual-Eyes not being set to access the 2 way texting feature. You will need someone in your clinic with Owner access to go into VE Admin - Owner - UserList, select the user that they want to have access to 2 way texting, and click Edit. Next, in the Visual care Tab, Select Text Conversation in the Visual Connect drop down then click Save.

If it asks for an email address and cell number you can either enter in an email for the user or simply put in fake@fake.com and for the cell number you can put in 555-555-5555, this is for two factor authorization on Visual Care so the user can change their password and if they don't need to use it you can use the fake information and it will let you save.
Then click Exit and Publish All. Once the permissions are set the user will need to close down Visual-Eyes completely and reload it and log in. Once that is done it will create a user for them in your Visual Care Admin Portal. You will need to go to your Admin Portal and in Settings - Users & Accounts - Manage Admins
Then click on Grant Permission(s) next to their user name.
Then, in the Permissions screen, scroll down to Text Conversations and check mark View Current Location, Create Current Location and Manage Canned Messages, you can check mark the All Locations ones too if your clinic is replicated with other clinics and you want that user to be able to view, and reply to any location.
Then scroll to the bottom of the Permissions screen and click Grant Permissions.
And now your team is set up to start using the 2 way texting within Visual-Eyes.
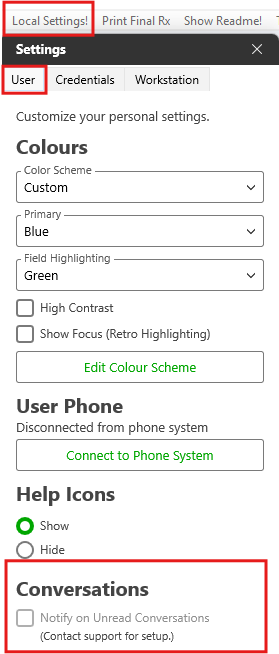
If you would like the Text Px button to turn Red when you have unread messages, you will need to go into Visual-Eyes and click on Local Settings, located in the top bar, and then click on User and then scroll down to the bottom of that screen to Conversations and check mark the box next to Notify on Unread Conversations
If you encounter access issues after completing the steps above, please email support@visual-eyes.ca . Include your clinic name, the specific guide you are using, any error messages, and a detailed description of the problem. Our Product Support Team will happily assist you.
For additional training on Visual-Eyes/Visual Care products and services, please contact trainers@visual-eyes.ca .
To suggest improvements or new features for Visual-Eyes and Visual Care, please email ideas@visual-eyes.ca . The team will review your submission and may contact you for further clarification. Additionally, they will also provide instructions if the requested feature is already available.
We value your feedback and appreciate your contributions. Thank you.
Related Articles
Sending Faxes within Visual-Eyes
This article explains how to configure the GoTo Connect integration in Visual-Eyes to enable faxing from multiple locations within the software, including Linking, Invoice, Exam Letters, Rolodex, and Rx Orders. Prerequisites Visual Connect or Visual ...Set up a Practitioner in Visual Care
Adding a Practitioner to Visual Care 1. Log into your Visual Care Admin Portal 2. Click On Visual Book 3. Click on Manage Practitioners 4. Select the Doctor from the drop down lists for VB & Appt Reminders and Recalls & Orders. Set their name in ...Visual-Eyes User Manual (Updated 2022)
Attached to this article is a copy of our current Visual-Eyes Manual.Set Default Printers for Visual-Eyes Printouts
Configuring default printers for various Visual-Eyes printouts streamlines workflow by allowing each document type, such as invoices, prescriptions, and day sheets, to automatically use a dedicated printer. This eliminates manual printer selection ...How to Access Visual-Eyes Online Training Resources
Visual Academy provides all Visual-Eyes users with unlimited access to structured online training resources at no additional cost. All staff members can use this dedicated platform to enhance onboarding, master workflows, and stay informed as ...